.jpg)
Common mistakes people make with Stepping Stones and Decorative Gravel
- wholesale909
- Jun 29, 2025
- 4 min read
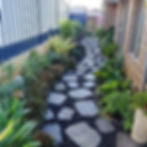
Landscaping with gravel and stepping stones is a great way to improve the appearance and function of your outdoor areas. It is a cost effective option and the project can be completed by most home owners with minimal tools and know how. A functional and attractive stepping stone pathway can be created in an afternoon.

However, despite its many benefits, people often make avoidable mistakes that can undermine their gravel projects.
Some of the most common mistakes when using gravel and stepping stones include
Not preparing properly
Using the wrong type of gravel.
Not using proper edging
Not maintaining your area.
Not Laying the Stepping Stones correctly
Using the incorrect Stepping Stone
These mistakes can lead to all kinds of issues like scattered gravel, and untidy edges, misplaced and cracked stepping stones which can detract from the overall beauty and durability of your landscaping.
Here is a brief overview of how to avoid common pitfalls when installing stepping stone and gravel pathways.
PREPARATION

Make sure your levels are accurate, as you want your pathway to be even with nearby alfrescos or paved pathways. You might want to raise your levels initially with a more affordable fill material like fill sand, road base, or blue metal dust. Plan for approximately 20-30mm of mortar if you're installing your paving on a wet mix (recommended).
Clear away any large rocks, and if you aren't using a wet mix for laying pavers, consider adding a sub-base.
The base layer serves as an essential foundation to stop gravel from moving, sinking, or becoming uneven over time. Without an adequate base layer, your gravel might sink, require frequent adjustments, or experience excessive weed growth. To prevent this, lay down a layer of landscaping fabric, cracker dust, or road base before adding your top layer of gravel. This straightforward step can help stabilize the gravel, enhance drainage, and minimize weed growth, resulting in a durable landscape. Ensure your base layer is well compacted.
USING THE RIGHT GRAVEL OR DECORATIVE STONE

Products like Blue Metal (10, 14,or 20mm), Cracked Pea Gravel, and Rainbow Stone are excellent choices. These are referred to as angular gravels, which interlock when walked or driven on, making them a safe option for walking.
Smaller gravels pose a lower choking risk for children, but if they are too small, you may frequently find them on your shoes and, consequently, inside your home.
Avoid round stones for pathways, as they can create a slip hazard (imagine walking on marbles).
When laying large pavers, it can create more balance to choose a slightly larger rock, especially if you are designing a dry creek-style area.
Consider the color scheme of both the exterior and interior of your home and try to reflect this in your selections.
USING THE CORRECT EDGING
This is a crucial aspect of your project. Failing to properly edge your pathway can cause your stones to scatter, which is both unattractive and hazardous.
Adding edging later is challenging, so consider it the framework for your path. It can determine the shape and width and help you achieve the correct finishing height.
Edging provides the opportunity to incorporate planting into your pathway and adjust the width to fit your stepping stones.
Planting can reduce the cost of your project, especially when using expensive decorative gravel, and can soften the appearance of your garden or provide much-needed planting space in smaller gardens.
Opt for steel or aluminum options—while there are wood and plastic alternatives, you'll end up replacing them frequently, which negates any initial savings. Replacing these items is not an easy task, so it's important to choose correctly from the beginning of your project.
HOW TO MAINTAIN A STEPPING STONE AND DECORATIVE GRAVEL PATHWAY
If you have followed the recommendations above, maintenance should be easy.
Ensure the soil from adjacent flower beds does not scatter onto the pathway, and that the mulch you add does not eventually overflow, as this will rot down and create a perfect spot for weeds.
Make sure you have put down a good coverage and rake it out regularly if the gravel has been disrupted. Weeds love any bare soil, so ensure there is none exposed.
Pull weeds as soon as you see them or spray with a carefully selected weed killer or vinegar (ensure it is safe for pets, children, and plants if there is a risk of runoff). The best way is to pull out the weed, root and all, as soon as you see it. That's it - very easy maintenance and a perfect low-maintenance option if prepared properly.
LAYING THE STEPPING STONES PROPERLY

Position your stepping stone in the centre of your pathway, use a tape measure to gauge the distance from a fixed point, like a nearby wall or fence. For greater accuracy, set up a string line, as the adjacent point might not be straight (avoid this by checking measurements at multiple points).
Avoid placing directly on gravel unless the stone is purely decorative and won't be walked on, such as in a decorative area.
Set the stones on wet mortar, and make sure the pavers are dry before adding decorative gravel.
Do not use the dot and dab method, as it creates weak points and uneven color on the paver due to varying water absorption. Instead, lay a full mortar bed beneath each paver.
Look out for any objects that might narrow the pathway, like bin storage or water heaters, and plan accordingly before you begin laying.
Maintain an even gap between pavers, ideally around 400mm.
Ensure your pavers are straight, level, and evenly spaced.
USING THE CORRECT STEPPING STONE
We have an additional blog on the correct selection of stepping stones.
In summary, choose one that complements the width and shape of your path.
For example, if you have a Japanese or country-themed garden, the Tobiishi stepping stone is a perfect choice. If your property is traditional, then the Heritage stone may suit better.
If your pathway is approaching a children's area, the turtle stepping stone may be a fun addition.
If you want a softer look, the round stepping stones will achieve this, or for a more contemporary angular look, the Riven style or larger format with a straight edge is a great choice.
If you are approaching a large front door, you would select a larger stepping stone or lay two together to achieve the desired width.
Avoid slippery surfaces such as some natural stone options.
Other than that, just choose something that you like and enjoy having a low-maintenance pathway that is easy to install for most homeowners.